Knowledge Base
Communicating with your Customers through WhatsApp How to Articles
Context:
WhatsApp is an extremely popular chat application that many MSPs - particularly in the UK, Australia and South America - use to communicate with their customers. MSP Process can be linked to your WhatsApp for Business account, and that integrate allows you to have chats within your PSA, over WhatsApp, to your customers.
This KB article outlines how to link your MSP Process tenant to a WhatsApp for Business account, and how to use the messaging features with the MSP Process Pod/Insight.
Prerequisites:
- You must have a WhatsApp for Business account
- You must have an account on https://developer.facebook.com
- You must be on the Pro license within MSP Process
- You must be an Admin-level user within MSP Process
Creating an App in your Facebook Developer Account
- Login to https://developer.facebook.com
- Click on My Apps, in the top right-hand corner of the site
- Click the Create App button
- Follow the wizard to complete setting up the app:
- We recommend naming the app MSP Process
- Choose the Connect with customers through WhatsApp use case:
- On the Business step of the wizard, you'll want to choose which business portfolio you want to link to the app. If you've already got a business portfiolio setup - great! If not though, set one up:
- Choose your business portfolio:
- On the Requirements step of the wizard, you can just click the Next button:
- On the Overview step of the wizard, review what you've setup, and click the Go to dashboard button to finish creating the app:
- You can log out of https://developer.facebook.com
Configuring the WhatsApp App in Meta Business
Creating a System User
- Login to https://business.facebook.com
- Navigate to Settings -> Users -> System Users
- Click the + Add button
- Enter a name for the user, and choose the Admin system user role
- Click the Create system user button to save the user
Assigning the MSP Process app to the System User
- Click the ... button and choose Assign Assets
- Select the MSP Process app, and enable all of the available permissions
- Click the Assign assets button
Creating a Token
- Click the Generate Token button
- On the first step of the wizard, select the MSP Process app
- On the second step of the wizard, set the expiration period to Never:
- On the third step of the wizard, assign all of the available permissions to this token:
- On the final step of the wizard, you'll be presented with the token; copy it somewhere secure, as you'll need to enter it into MSP Process a little later on. Click the Done button to close the wizard
Obtaining your WhatsApp Account ID
- In the https://business.facebook.com UI, navigate to Settings -> Accounts -> WhatsApp Accounts
- Record the ID shown for your WhatsApp Business account - you'll need to provide it to MSP Process later:
Creating a Message Template
In order to send messages through WhatsApp to your end-users, you need to first create a template of that message in the WhatsApp Manager UI.
- Use the Search capability in the menu of https://business.facebook.com to search for WhatsApp Manager
- Open the WhatsApp Manager tool
- Go to Message Templates -> Manage Templates
- Click the Create template button
- Choose the Utility category, and then click Next:
- Fill in the template fields as follows:
- Name: msp_process
- Type of variable: Number
- Body: MSP Process here - hey {{1}}. We'd like to help you with the support ticket that you've raised.
- Variable Sample: James
- Click the Submit for review button to save your template
NOTE: Meta can take up to 24 hours to review a submitted template
Configuring the WhatsApp Integration in MSP Process
Setting up and testing the integration
- Login to https://app.mspprocess.com as an Admin-level user
- Navigate to the Settings -> Integrations -> WhatsApp Messaging page
- Enter the Auth token that you generated earlier, and the WhatsApp Business ID
- Enter msp_process as the Default Template Name (if you named your default template something else, enter it's name here)
- Click the Test Connection button to have MSP Process confirm that it can communicate with your WhatsApp account
Configuring WhatsApp to Send Message Events to MSP Process
Once the connection between MSP Process and WhatsApp has been tested, you'll now need to configure your WhatsApp "app" to send webhooks to MSP Process when your customers message you on WhatsApp.
Before you leave MSP Process, click on the Copy Webhook URL button; you'll need that URL in just a minute:
- Login to https://developer.facebook.com
- Click on My Apps, in the top right-hand corner of the site
- Click on the MSP Process app you created earlier
- Click on the Use Cases menu item
- Click the Customize button for the Connect with customers through WhatsApp use case
- Go to the Configuration menu item
- Paste in the URL from earlier into the Callback URL field
- Enter mspp in the Verify token field
- Click the Verify and Save button
Congratulations! You're now able to start using MSP Process to chat with your customers, through WhatsApp.
Using WhatsApp to Message Your Customers
For MSPs Who Use Autotask:
You can access the WhatsApp messaging function from within the Messaging module; simply click the Create button and choose WhatsApp:
For MSPs who use ConnectWise or HaloPSA:
Once you've gone through the steps in this KB article, the Pod in ConnectWise or HaloPSA will have a new WhatsApp feature on the left-hand side of the UI:
For MSPs who use SuperOps, Syncro, or Kaseya BMS:
Access to WhatsApp is available on the PSA Tickets page in MSP Process; from that page, go to the Actions column for the ticket in question, and open the Pod for that ticket:
Using Message Templates
When MSPs text their customers - either through SMS, or through WhatsApp - there are often very commmon messages that are sent to end-users:
- Hey - do you have a minute to talk about this that you raised to us?
- Hey - thanks for working with me to fix that issue; I'm glad we got it solved! I'm going to go ahead and close off this ticket.
To save your technicians time, to avoid unncessary typos, and to make our WhatsApp integration as user-friendly as possible, you can create Message Templates that allow your technicians to very quickly create a text message without having to type it out.
Creating Message Templates can be done by Admin-level users, from the Messaging -> Message Templates page in MSP Process.
Using those Message Templates can be done by clicking the following button in the MSP Process Pod:
Troubleshooting
- This error means that the template you created earlier hasn't yet been approved by Meta. Patience, my son.
NOTE: This article is still a draft. We're almost done adding support for deploying the Identity Management module through the Microsoft Partner Center though. Stay tuned!
Introduction
The MSP Process platform can sync contacts from a variety of sources, including many common PSA platforms in the MSP market. Some MSPs don't use a supported PSA though - for example, they use an uncommon PSA, or they've built their own, homegrown solution. In other cases, Microsoft 365 is the "source of truth for a Contacts", and the PSA is downstream/synching contacts from Microsoft 365, so it makes sense to directly update those contacts in Microsoft 365, instead of in the PSA.
In those scenarios, MSPs can configure the MSP Process platform to directly sync Contacts with the end-user's Microsoft 365 contacts - allowing the MSP to leverage the End-user Verifcation, Secure Data Send, and Broadcast messaging features that are built into the platform.
Prerequisites:
- You must have Admin relationships setup in the Microsoft Partner Center to each of the M365 tenants you want to link to MSP Process
- Those Admin Relationships must include the Application Administrator and User Administrator Entra Roles
- Those Admin Relationships must apply the Application Administrator role to a Security Group (ideally one dedicated to this purpose, such as "GDAP - Application Administrator") and must also apply the User Administrator role to a Security Group (again, ideally one dedicated to this purpose, such as "GDAP - User Administrator")
- The Microsoft user account you intend to use during this setup process must be a member of those aforementioned two Security Groups in M365
Linking MSP Process with Microsoft 365
- Login to the MSP Process UI
- Navigate to the Settings -> Integrations -> PSA Integrations menu
- Click the Add button
- Click on the Microsoft 365 option
- Specify a name for the integation, and click the Submit button
- Click on the Microsoft 365 card that is now listed on the PSA Integrations page
- Click the Connect to Microsoft 365 (GDAP) button
- In the pop-up window that appears , click the Link for Redirect URI button:
Keep the MSP Process window open; in a separate browser tab login to https://portal.azure.com.
Configuring the Integration for a M365 Cloud Solution Provider (CSP) Environment
NOTE: The Admin Relationships you've established with your client's M365 tenants must have the Application administrator and User administrator roles assigned.
- Login to your Microsoft Azure portal (https://portal.azure.com)
- Navigate to App Registrations
- Add a new App Registration, and configure it as follows (note that the URL will change, depending on the ID of your M365 integration):
- Name: MSP Process GDAP Contact Sync App
- Supported Account Types: Accounts in any organizational directory (Any Microsoft Entra ID tenant - Multitenant)
- Redirect URI: Web; URI:
- Within the App Registration, go to Manage -> API Permissions, and assign the app the following permissions:
- NOTE: For the user_impersonation permission for the Partner Center, there are two identically-named permissions. It's confusing. To save yourself an enormous headache, search for applicationID fa3d9a0c-3fb0-42cc-9193-47c7ecd2edbd - that'll bring up the correct permission.
- Within the App Registration, navigate to Manage -> Certificates & Secrets, and add a new Client Secret. Copy that Client Secret, as you'll need it in just a moment
- In MSP Process, within the M365 integration that you created earlier, click the Connect to Microsoft 365 (GDAP) button
- In the pop-up window that appears, enter the required information:
- The Domain Name of your M365 CSP tenant (this is the Primary Domain that you'd see on the Home page, in Microsoft Entra)
- The Application ID of the app you just registered; this can be found on the Overview page of the App Registration
- The Client Secret from step #5
- Click Submit
- When prompted, enter your Microsoft credentials
- Once you're returned to the MSP Process UI, wait for just 1-2 minutes, and then reload the page. You'll see your GDAP-linked tenants:
- Click the Sync Companies button, and then the Sync Users button
Interacting with Microsoft 365 Contacts in the MSP Process UI
Once you've integrated MSP Process with one or more Microsoft 365 tenants, you can view those Contacts from the Contacts menu:
From the Contacts page, you can view the Mobile Number and E-mail address of each contact. From the Actions column, you can open the MSP Process Pod, which will allow you to perform End-user Verification, securely send your customers data, and respond to Technician Verification requests.
Installing the TechAssist app in Microsoft Teams How to Articles
Context:
Many MSPs work exclusively in their PSA, but there are also a lot of MSPs who use Microsoft Teams for internal communications, and don't want their technicians to have to switch back and forth between their PSA and Teams just to get their job done.
The TechAssist app is a Microsoft Teams app that has been designed to help MSPs do more within Teams. The initial version will allow for messages to be sent directly to a technician in Microsoft Teams, instead of just posting content into a Teams channel. Subsequent versions of the app will allow your technicians to use AI to query the deep pool of information you have in your PSA, and will also allow your technicians to work on tickets - changing statuses, adding notes, and having conversations - right from an adaptive card in a Teams channel of your choosing.
Required Licensing
To use the TechAssist app, you must be on the Pro plan within MSP Process, as the TechAssist app is tightly linked to the Monitor & Notify module.
Installing the TechAssist App
There are two ways you can install the TechAssist app - directly into your Microsoft Teams app, or using the Teams Admin website to deploy it to all of your technicians using a Setup Policy. In this KB article we'll walk you through how to deploy it to just your instance of Microsoft Teams.
Deploying the TechAssist app into your instance of Microsoft Teams
- Open your Microsoft Teams app, and then open the Apps module
- Search for TechAssist
- Install the application
Sending a Direct Message to a Technician in Microsoft Teams
Scenario: You want to send a direct message in Microsoft Teams to a technician, whenever a ticket in the Escalated status is assigned to that technician. For details on how to ingest that data, please refer to this KB article.
- Login to MSP Process (https://app.mspprocess.com) as an Admin-level user
- Navigate to the Monitor & Notify -> Workflows page
- Click the Create button to create a new Workflow
- Specify a name for this Workflow (for example, "Notify on Escalated Tickets"), and configure the Input of the Workflow to be the Data View you created in the KB article referenced above
- Enable the MS Teams output option, and click on the gear icon to configure it
- Configure things as outlined below - you'll want the variable you use to be <whatever variable equates to your technician's email address>:
Receiving a Direct Message from the TechAssist app in Microsoft Teams
The technician receiving the direct message in Microsoft Teams will see it come from the TechAssist app:
Deploying the M365 Password Reset Module to one M365 Tenant How to Articles
Context:
MSP Process allows you to reset a user's M365 password, right from within your PSA, or from the Contacts/Tickets pages in the MSP Process UI. Using the feature is exceedingly easy, but there are a few quick setup steps that need to be taken before the feature can be used.
Linking MSP Process to your M365 Environments
You'll need to deploy our Enterprise Application to your customer's M365 environments before MSP Process can change an end-user's password.
Creating the App Registration
- Login to your Microsoft Azure portal (https://portal.azure.com)
- Navigate to App Registrations
- Add a new App Registration, and configure it as follows (note that the URL will change, depending on the ID of your M365 integration):
- Name: MSP Process: M365 Password Reset
- Supported Account Types: Accounts in this organizational directory only (Default Directory Only- Single Tenant)
- Redirect URI: This is an optional field; please leave it blank
-
- Click Register when you're ready.
-
Assigning Permissions
- Within the App Registration that you just registered, navigate to the Manage -> API permissions blade
- Configure the App Registration to have the following permissions:
- Click the Grand admin consent for button
Creating a Client Secret
- Within the App Registration, navigate to the Manage -> Certificates & Secrets blade
- Click the + New client secret button
- Specify a name for this client secret, and set the expiration date to be 730 days (24 months)
- Click the Add button
- Copy the Value of this new client secret - you'll need it in the next section
Configuring MSP Process to Communicate with the App Registration
- Login to MSP Process (https://app.mspprocess.com) as an Admin-level user
- Navigate to the Settings -> Integrations -> Security Integrations page
- Click on the Add New Integration button
- Click on the M365 Identity Management button
- Fill in the required fields:
- Click the Submit button to finish setting everything up
Using the Password Reset Feature
The Password Reset feature is available in the MSP Process UI, from either the Contacts page or the Tickets page. It's also available in the ConnectWise and HaloPSA "pods", and will shortly be available in the Autotask Insight.
In order to change a user's M365 password, they must first be verified using the End-User Verification feature. If they haven't yet been verified, we'll show you this handy message when you hover over the Password Reset button:
Once you've verified the user's identity though, you can then invoke the Password Reset feature:
You'll then be asked to confirm that you want to reset their password:
What Is Your End-User's Experience?
We send the user their new password through our Secure Data Sharing feature - ensuring a branded and consistent experience. The link to their new password is sent as an SMS message, to the phone number they have registered in Microsoft as an Authentication Method:
Syncing Contacts with Microsoft 365 (Using Admin Relationships in the Microsoft Partner Center) How to Articles
Introduction
The MSP Process platform can sync contacts from a variety of sources, including many common PSA platforms in the MSP market. Some MSPs don't use a supported PSA though - for example, they use an uncommon PSA, or they've built their own, homegrown solution. In other cases, Microsoft 365 is the "source of truth for a Contacts", and the PSA is downstream/synching contacts from Microsoft 365, so it makes sense to directly update those contacts in Microsoft 365, instead of in the PSA.
In those scenarios, MSPs can configure the MSP Process platform to directly sync Contacts with the end-user's Microsoft 365 contacts - allowing the MSP to leverage the End-user Verifcation, Secure Data Send, and Broadcast messaging features that are built into the platform.
Prerequisites:
- You must have Admin relationships setup in the Microsoft Partner Center to each of the M365 tenants you want to link to MSP Process
- Those Admin Relationships must include the Application Administrator and User Administrator Entra Roles
- Those Admin Relationships must apply the Application Administrator role to a Security Group (ideally one dedicated to this purpose, such as "GDAP - Application Administrator") and must also apply the User Administrator role to a Security Group (again, ideally one dedicated to this purpose, such as "GDAP - User Administrator")
- The Microsoft user account you intend to use during this setup process must be a member of those aforementioned two Security Groups in M365
Linking MSP Process with Microsoft 365
- Login to the MSP Process UI
- Navigate to the Settings -> Integrations -> PSA Integrations menu
- Click the Add button
- Click on the Microsoft 365 option
- Specify a name for the integation, and click the Submit button
- Click on the Microsoft 365 card that is now listed on the PSA Integrations page
- Click the Connect to Microsoft 365 (GDAP) button
- In the pop-up window that appears , click the Link for Redirect URI button:
Keep the MSP Process window open; in a separate browser tab login to https://portal.azure.com.
Configuring the Integration for a M365 Cloud Solution Provider (CSP) Environment
NOTE: The Admin Relationships you've established with your client's M365 tenants must have the Application administrator and User administrator roles assigned.
- Login to your Microsoft Azure portal (https://portal.azure.com)
- Navigate to App Registrations
- Add a new App Registration, and configure it as follows (note that the URL will change, depending on the ID of your M365 integration):
- Name: MSP Process GDAP Contact Sync App
- Supported Account Types: Accounts in any organizational directory (Any Microsoft Entra ID tenant - Multitenant)
- Redirect URI: Web; URI:
- Within the App Registration, go to Manage -> API Permissions, and assign the app the following permissions:
- NOTE: For the user_impersonation permission for the Partner Center, there are two identically-named permissions. It's confusing. To save yourself an enormous headache, search for applicationID fa3d9a0c-3fb0-42cc-9193-47c7ecd2edbd - that'll bring up the correct permission.
- Within the App Registration, navigate to Manage -> Certificates & Secrets, and add a new Client Secret. Copy that Client Secret, as you'll need it in just a moment
- In MSP Process, within the M365 integration that you created earlier, click the Connect to Microsoft 365 (GDAP) button
- In the pop-up window that appears, enter the required information:
- The Domain Name of your M365 CSP tenant (this is the Primary Domain that you'd see on the Home page, in Microsoft Entra)
- The Application ID of the app you just registered; this can be found on the Overview page of the App Registration
- The Client Secret from step #5
- Click Submit
- When prompted, enter your Microsoft credentials
- Once you're returned to the MSP Process UI, wait for just 1-2 minutes, and then reload the page. You'll see your GDAP-linked tenants:
- Click the Sync Companies button, and then the Sync Users button
Interacting with Microsoft 365 Contacts in the MSP Process UI
Once you've integrated MSP Process with one or more Microsoft 365 tenants, you can view those Contacts from the Contacts menu:
From the Contacts page, you can view the Mobile Number and E-mail address of each contact. From the Actions column, you can open the MSP Process Pod, which will allow you to perform End-user Verification, securely send your customers data, and respond to Technician Verification requests.
Using the Secure Data Request Feature How to Articles
Introduction
Secure Data Request is a feature that lets you ask your end-user for data. That request can be sent out as either an email or a text message, and it guides your end-user to a fully branded/whitelabeled page where they can choose to enter the information you've requested, or reject your request.
Let's walk through how to configure the Secure Data Request feature, and how to use it within your PSA.
Configuring Secure Data Requests
All aspects of Secure Data Requests are customizable - from the URL send to your customer (via the Custom Subdomains feature) to the Email and SMS templates that are sent out.
The configuration options for Secure Data Requests are available under the Secure Data Sharing -> Secure Data Settings page, on the Secure Data Request Settings tab:
You can also - on the Secure Data Request Templates tab - build out pre-canned wording for your team to use when they request data from their customer. Here's one example:
Using the Secure Data Request Feature
The Secure Data Request feature is super easy to use - enter the message that you want to send to the end user, click Get Link, and choose whether you want to send the request to the end-user as an Email or as an SMS message.
Autotask:
ConnectWise/HaloPSA/Kaseya BMS/Syncro/SuperOps:
Accessing Data That Your End-User Submitted
You can access the data your end-user submitted from the MSP Process Pod/Insight in your PSA, or from the Secure Data Sharing -> Secure Data Requests page. Note that the UI will only display requests that you (as an MSP Process user) have sent to an end-user.
Clicking on the green eyeball icon in the Actions column brings you to the details of that request:
Security
- Only the Technician who has requested data from an end-user can see the the data that end-user submitted. Other technicians won't see the entry from that end-user on the Request List tab (in the Pod/Insight) or on the Secure Data Sharing -> Secure Data Requests page.
- The Secure Data Sharing -> Secure Data Logs page provides a detailed overview of each Secure Data Request that has been sent out, as well as whether it's been submitted by the end-user
- The Settings -> User Management -> Activity Logs page shows when your technicians have generated Secure Data Requests
Configuring a Custom Sub-Domain for URLs Sent to End-Users How to Articles
Context:
There are 3 features in MSP Process that can send your customers hyperlinks (URLs):
- End-user verification (using the Email Link or SMS Link options)
- Opt-in forms
- Secure Data Send
By default, the URLs those features send are on the https://app.mspprocess.com subdomain. As many MSPs wish to fully white-label the features provided by MSP Process, and also want their customers to only trust websites that the MSP controls or recommends, there is a feature in MSP Process that allows Admins to create a custom subdomain, and for MSP Process to use that subdomain when sending out URLs.
Prerequisites
- You'll need access to your DNS service provider, as you'll be creating two DNS records in your domain
- You'll want to have thought of a subdomain ahead of time - for example, secure.mymsp.com
Configuring a Custom Subdomain
- Login to MSP Process as an Admin-level user
- Navigate to the Settings -> Account Settings -> Custom Subdomain page
- In Step 1 of the wizard, specify the sub-domain that you want to use:
- In Step 2, add the specified DNS records in your DNS provider's UI
- In Step 3, click Validate to confirm that everything has been setup correctly; once the test passes, click the Save button to continue
- When prompted, click the Generate SSL Certificate button, and then click the Bind SSL Certificate button
Congratulations! You've now configured MSP Process to use a subdomain of your choosing when sending our URLs to your end-users.
Handling Errors
You may encounter the following error when clicking the Generate SSL Certificate button:
To resolve that issue, double-check that your CNAME record doesn't have proxying enabled. The screenshots below are from CloudFlare; your DNS provider may have a similar feature, but under a different name or in a different screen layout.
Good:
Bad:
Deleting a Custom Subdomain
If you need to delete the custom domain that you've configured, navigate to the Account Settings -> Custom Subdomain page, and click the
button:
Importing Contacts from CSV How to Articles
Introduction:
If you're looking to do end-user verification on your helpdesk, but you happen to be using a PSA that MSP Process doesn't support, no worries! We allow for contacts to be imported from a CSV file into our database; once imported, you can then use the End-User Verification, Technician Verification and Secure Data Send features.
MSP Process supports importing files from the following sources:
- Microsoft Entra (https://entra.microsoft.com), under the Users -> All Users page
- Microsoft 365 (https://admin.microsoft.com), under the Users -> Active Users page
- Google Workspace
Importing Contacts into MSP Process
- Download the CSV file from Microsoft or Google
- Login to MSP Process (https://app.mspprocess.com)
- Navigate to the Settings -> Integrations -> PSA Integrations page
- Click the Add New Integration button
- Click the CSV button
- Specify a Name
- On the PSA Integrations page, click into your CSV integration
- Click the Import Data button
- Upload your CSV file
- Congrats! You've now uploaded contacts into MSP Process
Options During the Import Process
- The Remove other records option will erase any previously-uploaded contacts
- The Skip existing records option will ignore any existing contacts, and will not update their information
Interacting with Imported Contacts
Now that you've imported your contacts into MSP Process, you can interact with them from the Contacts page - it can be found at the very top of the left-hand menu in MSP Process:
On the Contacts page, find the end-user you're looking for, and then in the Actions column click the Pod icon:
Within the Pod, you'll then be able to perform end-user verification, securely send data using the Secure Data Send feature, and respond to Technician Verification requests:
Introduction
When an end-user calls into your helpdesk, one of the options you can use to verify their identity is to send them an end-user verification code or link through Microsoft Teams.
In order to send the verification code or link through Microsoft Teams, you must first customize the MSP Process Teams bot, and then deploy it to your client's Microsoft Teams environment.
Customizing the MSP Process Teams Bot
- Login to the MSP Process UI (https://app.mspprocess.com)
- Navigate to the AI Service Desk -> Client Portal -> Teams Bot Configuration page
- Configure the Bot so that it has your logo, is named appropriately (so that you your customers will understand who the messages are coming from), and has an appropriate description:
- NOTE: For optimal readability, the logo you upload should be 192 x 192 pixels
- The following fields are required by Microsoft; here's how we recommend to configure them:
- Description (Short): If you've got a snazzy marketing slogan for your MSP ("Our MSP is the place to be!") put it here.
- Description (Long): Enter text that'll tell your end-users what they should use the app for: "Use this app to interact with the Blue Wolf IT Team on your Support requests."
- Website URL: Enter your website URL; it must start with https://
- Privacy Policy: Enter the URL to your privacy policy. If you don't have a privacy policy, just enter the URL of your website. It must start with https://
- Terms of Service: Enter the URL to your Terms and Conditions. If you don't have a Terms and Conditions web page, just enter the URL of your website. It must start with https://
- When everything has been configured, click the Get Zip File button
Deploying the Bot for Testing Purposes, to One User
You may wish to test out how the MSP Process Teams bot looks by first making it available in your own MS Teams environment. This can be done for a single user, allowing you (the user) to test things out before deploying it to your customers.
Source: These instructions come from a Microsoft KB article (here)
To upload the app to Teams
-
In the Teams client, select the Apps icon.
-
Select Manage your apps.
-
Select Upload an app.
-
Look for the option to Upload a custom app. If the option is visible, custom app upload is enabled.
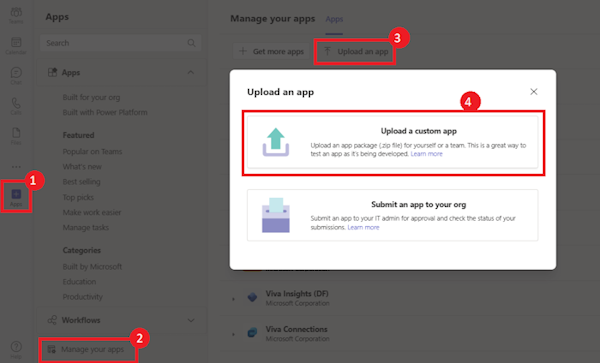
Note: Contact your Teams administrator, if you don't find the option to upload a custom app.
-
Select Open to upload the .zip file that you created earlier.
-
Click Add.
-
Select Open to use the app in personal scope.
Alternatively, you can either search and select the required scope or select a channel or chat from the list, and move through the dialog to select Go.
Congratulations! You have now deployed your MS Teams bot into your MS Teams environment, and you've made it available for testing purposes.
Deploying the MSP Process Teams Bot to a Client's Microsoft Teams Environment
- Login to the Microsoft Teams Admin Center, and navigate to Teams Apps -> Manage Apps (Direct Link: https://admin.teams.microsoft.com/policies/manage-apps)
- Click on Actions -> Upload new app
- Click the Upload button to upload the .zip file that you created earlier.
- Once the app has been uploaded, navigate to Teams Apps -> Setup Policies
- Click the Add button to create a new policy
- Give this app policy an appropriate Name and Description
- In the Installed Apps section, click the Add apps button, and choose your MSP Process Teams bot
- Click Save
- Click on the Group policy assignment tab
- Click the Add button, and assign your app policy to the appropriate list of end-users (in this example, I'm assigning the app to everyone)
That's it! You've now deployed your customized version of the MSP Process Teams bot to your client's Microsoft Teams environment.
Sending End-user Verification Codes/Links through Microsoft Teams
Now that you've deployed your customized version of the MSP Process Teams bot to your client's Microsoft Teams environment, you can start sending them end-user verification codes or links. For ConnectWise, HaloPSA, SuperOps.ai, Syncro or Zendesk partners, you'll click on the red shield beside the user's e-mail address:
You'll then be able to send that end-user either a code or a link through Microsoft Teams by clicking the apporpriate button:
For our Autotask partners, you'll see the two new Teams-related options (Teams Code and Teams Link) in the Verification feature, in the drop-down menu:
Syncing Contacts with Microsoft 365 (One M365 Tenant at a Time) How to Articles
Introduction
The MSP Process platform can sync contacts from a variety of sources, including many common PSA platforms in the MSP market. Some MSPs don't use a supported PSA though - for example, they use an uncommon PSA, or they've built their own, homegrown solution. In other cases, Microsoft 365 is the "source of truth for a Contacts", and the PSA is downstream/synching contacts from Microsoft 365, so it makes sense to directly update those contacts in Microsoft 365, instead of in the PSA.
In those scenarios, MSPs can configure the MSP Process platform to directly sync Contacts with the end-user's Microsoft 365 contacts - allowing the MSP to leverage the End-user Verifcation, Secure Data Send, and Broadcast messaging features that are built into the platform.
NOTE: This KB article deals with linking MSP Process to one M365 tenant at a time. To link MSP Process to all of your M365 tenants, using the Admin relationships you've setup in the Microsoft Partner Center, please refer to this KB article.
Linking MSP Process with Microsoft 365
- Login to the MSP Process UI (https://app.mspprocess.com) as an Admin-level user
- Navigate to the Settings -> Integrations -> PSA Integrations menu
- Click the Add button
- Click on the Microsoft 365 option
- Specify a name for the integation, and click the Submit button
- Click on the Microsoft 365 card that is now listed on the PSA Integrations page
Configuring the M365 Integration on a Tenant-by-Tenant Basis
- Click the Connect to Microsoft 365 button to link MSP Process to a Microsoft 365 tenant
- Follow the Microsoft UI flow to deploy the MSP Process app
- Click the Sync Companies button, and then the Sync Users button
- You're done! Repeat with any other Microsoft 365 tenants that you want to link to the MSP Process platform.
Interacting with Microsoft 365 Contacts in the MSP Process UI
Once you've integrated MSP Process with one or more Microsoft 365 tenants, you can view those Contacts from the Contacts menu:
From the Contacts page, you can view the Mobile Number and E-mail address of each contact. From the Actions column, you can open the MSP Process Pod, which will allow you to perform End-user Verification, securely send your customers data, and respond to Technician Verification requests.
Sending E-mails through an M365 Shared Mailbox How to Articles
Introduction:
By default, any e-mail sent by the MSP Process platform comes from noprely@mspprocess.com. For e-mails that are sent internally to an MSP, such as invites for technicians to join the MSP Process platform, this is a perfectly acceptable thing, but it's not ideal when dealing with e-mails that are sent to end-users, such as Opt-in forms and End-user Verification e-mails.
The MSP Process platform can be configured to send all of it's end-user facing e-mails through a Microsoft 365 shared mailbox - making it easy for any Partner to send our e-mails from a trusted Sender address of their choosing.
Configuring MSP Process to use a Microsoft 365 Shared Mailbox
- Login to the MSP Process UI with an Admin account
- Navigate to the Settings -> Account Settings -> Outgoing Mail page
- Click the Start Setup button
- Login to the Microsoft 365 tenant that owns the Shared Mailbox you wish to use
- Approve the deployment of the MSP Process "Outbound Mail Module" application
- You're now able to choose which mailbox you wish to use:
- Click the Submit button to finish the setup process
Testing the Shared Mailbox Configuration
- From the Settings -> Account Settings -> Outgoing Mail page, click the Test button
- You'll be brought to the Settings -> Account Settings -> Test E-mail page
- Choose the "Opt-In Letter" as the e-mail to be sent, and specify the recipient's e-mail address
- Click the Test button to send out the test e-mail
- Confirm that the recipient received the e-mail, and that the Sender address is the Shared Mailbox
Deleting a Shared Mailbox Configuration
- Navigate to the Settings -> Account Settings -> Outgoing Mail page
- Click the Delete button
E-mails that are sent through an M365 Shared Mailbox:
- Opt-in forms
- End-user verification - both codes and secure links
- Secure Data Send e-mails
- Invitations to the Client Portal
E-mails that are not sent through an M365 Shared Mailbox:
- Invites to join the MSP Process platform (sent via the Settings -> User Management-> Invite Users page)
- Password reset e-mails
- E-mails from the "Notifications" module
Creating a Microsoft Teams Connection How to Articles
Introduction:
Several features in the MSP Process platform can send messages to Microsoft Teams channels:
- When a new text message is send to an SMS number
- When a new Live Chat is created
- When a new Client Portal chat is created
The goal of this KB article is to walk through how to setup a Workflow in Microsoft Teams that can accept the messages from the MSP Process platform, and to configure MSP Process so it knows about the Microsoft Teams channel.
Creating a Workflow in Microsoft Teams:
In the Microsoft Teams app, launch the Workflows feature by clicking on the ... menu item, and searching for "Workflows":
- In the Workflows app, click the
button
- Click the
button
- Create a workflow that looks like this:
Here's what the Parse JSON action should look like:
And here's the text that goes in the Schema field:
{
"type": "object",
"properties": {
"text": {
"type": "string"
}
}
}
Finally, here's how the "Post message in a chat or channel" action is configured:
Configuring a Microsoft Teams Connection in MSP Process:
- Login to the MSP Process UI (https://app.mspprocess.com) as an Admin-level user
- Navigate to the Settings -> Account Settings -> Teams Connections page
- Click the Add button:
- Fill in the two required fields:
- Give the connection a name
- In the URL field, paste the URL from the Microsoft Teams workflow - the URL can be found in the When a Teams webhook request is received action:
- Click the Test button to ensure that the connection to your Microsoft Teams workflow is correctly setup - you should see the message "Hello, World" in the Microsoft Teams channel you specified in the Workflow.
- Click the Submit button to save the connection
Secure Data Send Settings How to Articles
To configure the default settings for the Secure Data Send feature, login to the main MSP Process UI (https://app.mspprocess.com), and navigate to the Secure Data Sharing -> Secure Data Settings page.
The Secure Data Settings page allows you to configure how sending both text and files will behave. You can also choose to lock down these settings, so they can't be modified by your Technicians.
Disable technician ability to change link, logs and file settings on secure data page - This locks the settings that a technician sees when sending a customer data or text.
Enable File Sending - This enables the ability to securely send files to your customers. By default, it's enabled.
Single Use Link - This makes it so that the end-user can only access the text/data once.
Time to live for secure text send links - When sending text, this controls how long the link will be active.
Save Logs to Ticket/Contact - This will save the actions of the tech and the user regarding the link. This includes when the tech sent it, and when the user opened it.
Save logs to internal note - This will save logs of all actions to the internal note on your PSA instead of public discussion note section.
Save data to internal note - Whatever password or text is sent to the user would be logged as an internal note. By default this option is disabled.
File save expiration period - Controls how long a file will be available. Default is 1 day.
File save location - Controls which region the file will be stored. By default this will be in the same country that was specified for your tenant with MSP Process. There is storage available in the following regions:
- One in Canada Central (located in Toronto)
- Another in Central US (located in Iowa)
- Another in Europe (located in Frankfurt, Germany)
- Another in Australia East (based in Sydney)
- And one in UK South (based in London)
Page Header Text - This is the header displayed to the user above the link when they receive the message and click the link.
Message on Reveal Secure Data - This is a message is revealed once the user shows the data from the link.
SMS Template - Messaging that is sent with the SMS link to the user. You can put text before and/or after the link. Do note remove the ${link} as this will break the functionality.
Email Template - Same as above, you can add text before and/or after the link.
Data Storage and Deletion
When your send Text to your end-user, we do not store that data in our system. All that is stored in MSP Process is the decryption key for the data. When your end-user access the data, we immediately delete the decryption key.
When you send a File to your end-user, we store the file, in encrypted form, in our system. Once your end-user has downloaded the File, we delete that File within two hours.
Company Policies How to Articles
Company Policies
The Company Policies feature allows you to create a pop-up message, in our Autotask Insight/ConnectWise Pod/HaloPSA custom tab that can be customized per-Company. Company Policies are configured from the Identity Management -> Verification -> Policies page.
The Show Verification Banner on Load option means it will display the pop-up message you specify whenever your technicians open a ticket for the specified Company:
Update your Company Logo How to Articles
Click on Settings -> Account Settings -> Settings. Then click on the Upload new Image link: